
这是本部分最核心的内容。我们通过三个实战案例,手把手教你创建自己的Skill。
4.3.1 识别 Skill 化的机会
观察你日常使用AI时的重复行为:
- 你是否经常给AI写类似的Prompt?→ 把它变成Skill
- 你的项目是否有固定的开发模式?→ 把它变成Skill
- 你是否有标准化的审查流程?→ 把它变成Skill
提示:DRY原则(Don’t Repeat Yourself)不仅适用于代码,也适用于Prompt。如果你发现自己连续3次写了类似的Prompt,就是时候把它Skill化了。
4.3.2 实战:创建一个 React 组件生成 Skill
需求:每次创建新的React组件时,需要遵循统一的文件结构和编码规范。我们来创建一个包含模板和验证脚本的完整 Skill 包。
Step 1:创建 Skill 目录结构
在项目根目录下创建如下结构:
# 一次性创建完整的 Skill 目录
$ mkdir -p .claude/skills/react-component/scripts
$ mkdir -p .claude/skills/react-component/resources/template
$ mkdir -p .claude/skills/react-component/resources/examples
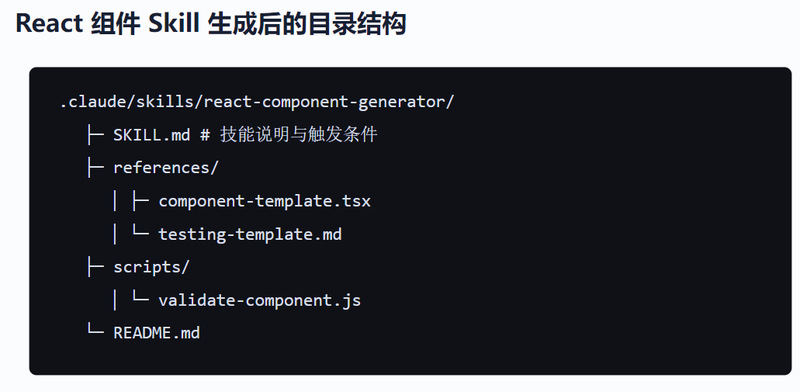
创建后的目录结构:
.claude/skills/react-component/    # Skill 根目录
├── SKILL.md                  # 核心指令文件
├── scripts/                  # 辅助脚本
│   └── validate.js             # 组件结构验证脚本
└── resources/                 # 配套资源
   ├── template/               # 代码模板
   │   ├── component.tsx.tpl      # 组件主文件模板
   │   └── test.tsx.tpl         # 测试文件模板
   └── examples/               # 示例
      └── BookmarkCard-example/   # 一个完整的示例组件供参考
Step 2:编写 SKILL.md(核心指令)
创建 .claude/skills/react-component/SKILL.md:
---
name: react-component-generator
version: 1.0
description: 根据组件名称和功能描述,生成符合项目规范的 React 组件文件集
trigger: ["创建组件", "新建React组件", "生成组件"]
tools: ["typescript", "react", "tailwindcss"]
author: your-name
---

# React 组件生成器

## 触发条件
当用户要求创建新的 React 组件时使用此 Skill。

## 输入参数
- componentName(必填):组件名称,使用 PascalCase 格式
- description(必填):组件功能描述
- hasProps(可选,默认true):是否需要 Props 类型定义
- hasState(可选,默认false):是否需要状态管理

## 执行步骤

1. 在 `src/components/` 目录下创建组件文件夹:
   `src/components/{componentName}/`

2. 参考 `resources/template/` 中的模板文件创建以下文件:
   - `index.tsx` - 组件主文件(参考 component.tsx.tpl)
   - `types.ts` - TypeScript 类型定义(如果 hasProps=true)
   - `{componentName}.test.tsx` - 测试文件(参考 test.tsx.tpl)

3. 组件代码规范:
   - 使用函数式组件 + TypeScript
   - Props 使用 interface 定义,命名为 {componentName}Props
   - 使用 Tailwind CSS 处理样式
   - 导出使用 named export
   - 添加 JSDoc 注释说明组件功能

4. 测试代码规范:
   - 使用 @testing-library/react
   - 至少包含:渲染测试、Props 传递测试

5. 创建完成后,可运行 `scripts/validate.js` 验证组件结构完整性。

## 输出规范
- 所有文件创建完成后,报告创建的文件列表
- 给出组件的使用示例代码

## 参考示例
参见 `resources/examples/BookmarkCard-example/` 中的完整示例。

## 示例

输入:
- componentName: "BookmarkCard"
- description: "展示单个书签的卡片组件,显示标题、URL和标签"
- hasProps: true
- hasState: false

预期输出文件:
- src/components/BookmarkCard/index.tsx
- src/components/BookmarkCard/types.ts
- src/components/BookmarkCard/BookmarkCard.test.tsx
Step 3:创建辅助脚本(scripts/)
创建 .claude/skills/react-component/scripts/validate.js:
// scripts/validate.js —— 验证组件目录结构是否完整
// AI 在执行 Skill 后可以运行此脚本进行自检

const fs = require('fs');
const path = require('path');

function validateComponent(componentName) {
  const dir = path.join('src/components', componentName);
  const requiredFiles = ['index.tsx', 'types.ts'];
  const missing = [];

  requiredFiles.forEach(file => {
   if (!fs.existsSync(path.join(dir, file))) {
     missing.push(file);
   }
  });

  if (missing.length > 0) {
   console.error(` 组件 ${componentName} 缺少文件: ${missing.join(', ')}`);
   return false;
  }
  console.log(` 组件 ${componentName} 结构验证通过`);
  return true;
}

// 从命令行参数获取组件名
const componentName = process.argv[2];
if (!componentName) {
  console.error('用法: node validate.js <ComponentName>');
  process.exit(1);
}
validateComponent(componentName);
Step 4:创建代码模板(resources/template/)
创建 .claude/skills/react-component/resources/template/component.tsx.tpl:
// resources/template/component.tsx.tpl —— 组件代码模板
// AI 生成代码时参考此模板结构

/**
 * {componentName} 组件
 * {description}
 */

import { {componentName}Props } from './types';

export function {componentName}({ ...props }: {componentName}Props) {
  return (
   <div className="...">
     {/* 组件内容 */}
   </div>
  );
}提示:
resources/template/中的模板文件不是让 AI 原样复制的,而是给 AI 一个”参考样式”。AI 会根据模板的结构和风格,结合用户需求生成实际代码。这比纯文字描述更直观,生成质量也更高。
Step 5:在 CLAUDE.md 中引用此 Skill
在你的 CLAUDE.md 文件中添加:
## 可用 Skills
- 创建 React 组件时,请读取 `.claude/skills/react-component/SKILL.md` 并严格遵循其中的规范
Step 6:使用 Skill
在 Claude Code 中输入:
> 请按照 React 组件生成器 Skill 的规范,创建一个 BookmarkCard 组件。
> 组件功能:展示单个书签的卡片,显示标题、URL、描述和标签列表。
> 需要 Props,不需要状态管理。
Claude Code 会按照 Skill 定义的规范,参考模板文件,自动创建所有文件。完成后你还可以运行验证脚本确认结构:
$ node .claude/skills/react-component/scripts/validate.js BookmarkCard
 组件 BookmarkCard 结构验证通过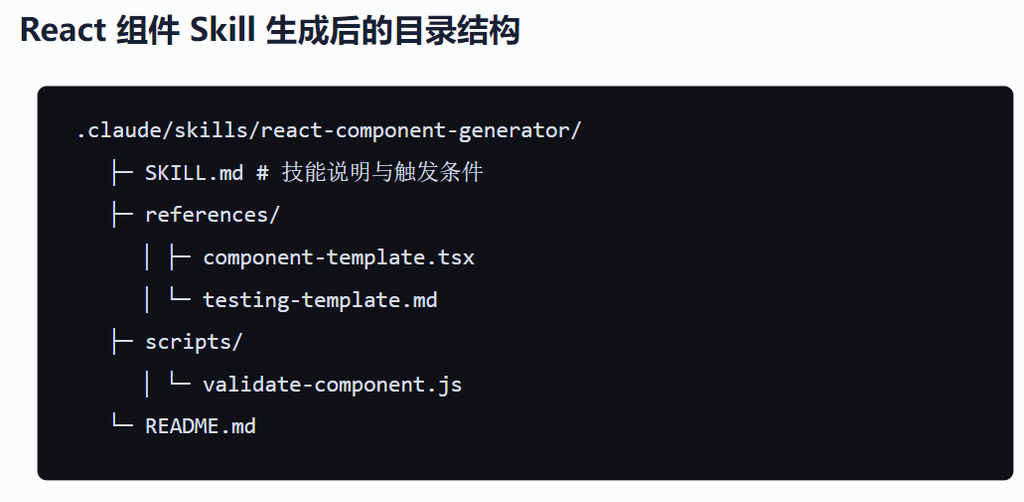
© 版权声明
文章版权归作者所有,未经允许请勿转载。
THE END











请登录后查看评论内容